Introduction: In this blog post I will start implementing the core mechanics that will make up the player and enemy interactions, this will include the player movement, player wall bouncing, enemy movement and enemy attack. These functions are key to the base mechanics of the game; can the player complete obstacles in the levels and can the enemy detect the player and kill.
The first step was to create the player movement which I used from one of my previous projects in the second year from my zombie survival games. However I did modify this
Script
Player Movement –
Player Movement
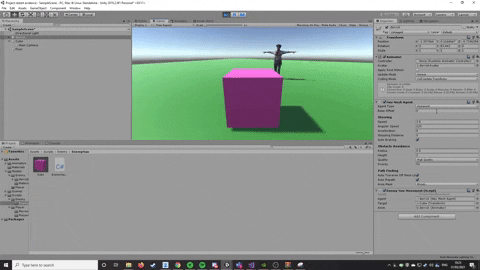
The player movement is controlled by the default controls for unity, using WASD to move round in the scene and then the mouse to look round using another script attached to the player and main camera (“Look X” + “Look Y”). Using the unity input i got the axis of “horizontal” and “vertical” to control the camera (this was taken from my zombie shooter game). However I changed the original script to use direction to update the player when moving forward through length measurement using magnitude, it takes the coordinates of the x and y from the players input and then calculates the target angle from the way they would be moving. Takes the rotation of the quaternion and converts the target angle through a eluer to convert the angle when the player moves.
A have a few issues with it, when the player moves forward there is a slight drift to the right or left but I am not too sure how to fix it, however it does work it is just not as slick as I would like. This can be a later fix when I have completed every thing else, its just a minor perfection I would like to make.
Jump
Then implemented a jump function which checks the player is grounded using an if statement and then applies jump speed, the jump is equal to gravity multiplied by time dot delta time. The else statement simply is just the walking function.
I noticed that the movement of the player is not very fluid and has some input issue where the player moves diagonal when the player presses forward. This is an issue that needs to be fixed so the core mechanics work.
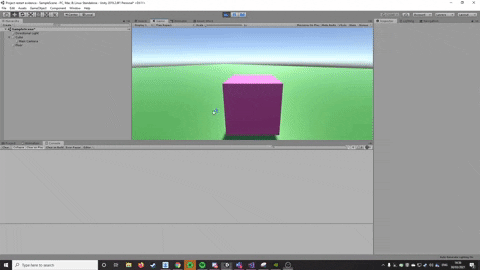
Wall bounce
The wall bounce mechanic from the tutorial that I was following was suppose to send the player in the opposite direction, it works but does not work as intended. This is not a massive issue but I am going to try resolve this by following the tutorial earlier to try fix it. However the raycast is being recognised when the player touches the wall to bounce of it. However the player can then just keep bouncing off the same wall to scale an obstacle which does affect the effectiveness of the mechanic. I am going to follow the tutorial again and see where my code differs in an attempt to get it to work as intended, its not a major issue but I feel like this affects the gameplay.
New Player Movement (script)-
So I changed what I did with the getAxis to GetAxisRaw because smoothing is applied to getAxis. This smooths the direction over time where as the GetAxisRaw does not apply the smoothing and inputs it automatically without smoothing over time (time.deltatime) by directly using the magnitude that has been applied in the script. This seemed to fix some of the issues that I was having with the movement going diagonal slightly after inputting a direction.
Instead of trying to use direction and prevDirection to get the last move equal to the current move I followed his script and made a vertical velocity that uses the jump force instead of jump speed to multiply the vertical velocity for the wall bounce to happen when the raycast detects the wall. Trying to kit bash one of my older movement scripts to the tutorial was what was causing the function to not perform correctly so after using his way of using move Vector and breaking down the jump force, gravity, vertical velocity, speed and last move made it much simpler to get the function work. So it was mainly two lines of code which was placed wrongly and was making the wall bounce not register properly, now that it has been reformed the code seems to work properly for the intended purpose. Also the raycast now is only being detected once now when the player wall bounces instead of multiple raycasts hitting the wall like before.
A 3D platformer where the player plays as a fruit imprisoned by the vegetables (opposing side) on a small island where the fruit is trapped. To escape the island the player needs to ascend each floor up the mountain and get to the top to escape or kill the king. One of the main mechanics to exhibit frustration will be a permadeath system, if the player dies then they will have to restart from the bottom which the player will use repetition to learn how to get to the end (levels of immersion). The storytelling will be told through objects or things that are happening on each floor leading up to the conclusion of the decision that the player will make. The decision will decide if the player massacres the veg (killing the king) or escape showing mercy to the king which leads to peace and harmony between fruit and veg.
Other game looked at:
Super Mario 64
3D style platform level design
Super Meat Boy
Level design and level mapping, potentially learning of how they implemented hazardous areas into the game (eg spikes, blades)
Getting over it
Kind of like a permadeath system where the player loses progression and one wrong move can drop you to the bottom of the map
Trap adventure
Making features in the game which is not expected and be a way of causing harsh frustration
Little nightmares
Style of escaping and getting through without combat
Story telling through the level design and environment
The games which are focused round this idea to build the game come from this 5 games which some are purposely built to frustrate the player and others that highlight how the mechanics could work with the style of storyline that will be displayed
Dissertation research areas focused on:
Frustration Levels and how that affects wanting to complete the game
Harsh frustration (Makes the player not want to play anymore)
Light frustration (Player gets slight frustration and feels rewarded after)
Levels of immersion
Getting use to mechanics
Understanding mechanics (repetition)
Mastering mechanics
Favourite activity/accomplishment in single player games
Activity: Playing the story
Accomplishment: finishing the game
Balanced challenge
The game gradually gets harder
Where its not to hard to beat the game
Mechanics and bugs
If the game has too many bugs it can break the immersion
If the player is immersed they will continue to keep playing to progress
My dissertation was focused at player behaviour cross-referenced with achievement data to see patterns if the player is or is not more likely to complete a game. Immersion and engagement were interpreted through these patterns that I found in my research with some key elements that I want to implement into my major project (Activity and accomplishment goals). It was clear that a sense of immersion needed to be built first to engage the player to keep playing through balanced gameplay and mechanics. Frustration was closely linked to frustration levels and how it could impact the game when the player quits or feels rewarded from small challenges they are faced with. These are the five key areas that I want to focus with what I am doing for my game and see if in the testing phase, I can get a difference in harsh and light frustration through a permadeath system on one playthrough and checkpoints at the start of levels.
User Description
The target audience for this game is players who enjoy 3D platformer games and have a preference for challenge and interpretive storytelling. The game is designed to gradually increase in difficulty, but not to the point where it becomes too hard to beat. The permadeath system will provide a sense of urgency for the player to progress and not make a mistake, but the repetition of learning the mechanics will theoretically increase their level of immersion in the game. The area will have some graphic themes but because of the themes of fruit and vegetables will take off the edge of some of the darker themes of revenge.
Gameplay/Mechanics:
The main mechanics of the game include wall bouncing, permadeath, and areas of danger. The player will have to navigate through spikes and enemies to reach each floor of the mountain. The final boss floor will require the player to defeat waves of enemies before reaching the king, who they can choose to kill or spare.
Mechanics Ideas
Player
Wall bounceMovement/ jump
Enemies
Ground Enemy/Flying enemyPatrol system Kills the player if they touch the player
Enemy Spawner
Spawns 20 enemies
Areas of danger
MoldPlayer/Enemy dies if they collides with the mold SpikesPlayer/Enemy dies if they collides with the moldTimer for the spikes to up and down
Achievement
Awarded an achievement for each floor that they progress through and if they get through the game
Mode selection
Normal modePermadeath: offCheckpoints: on each levelHard ModePermadeath: onCheckpoints: off, starts player at the first level
Mechanics Ideas
Floor mechanics
floor
Mechanics
Prison Floor (Floor 1)
Simple learning of the mechanics, a few wall bounces and enemies patrolling around chasing the player. The player needs to evade the ground enemies and get to the next floor.
Execution Floor (Floor 2)
Will start to implement more features like spike traps and flying enemies. Implementation of mold to make the game harder
Veg entertainment/living quarters (Floor 3)
Will make the game a little bit harder with more difficult jumps and more areas of danger
King Floor or Room (Floor 4)
Will include an enemy spawn system where the player has to use what they have learned and lead the enemies through mold and spikes to kill them. They have a choice of killing the king or showing mercy. Roll end scene and credits
Storyline:
The story of the game will be told through objects and events that occur on each floor of the mountain. The player’s final decision of whether to kill the king or spare him will determine the outcome of the story. If the player chooses to spare the king, a treaty is signed and fruit and vegetables will live in harmony. If the player chooses to kill the king, the fruit will take over the tower and massacre the vegetables.
In the first level, the player is escaping the prison block and trying to get to freedom, the next floor shows that the fruit is being executed by the veg and this is supposed to give the player a sense of revenge. The third floor shows the vegetables that have been living in luxury that is too adds to the feeling of rage the player gets. Walking into a room where one of the fruit has killed a family of veg is supposed to give the player a sense of remorse. The last level is to act on revenge or give mercy to the king which should make the player conflicted
This tale of revenge is highlighted in my dissertation as being a way to make the story more immersive and engaging to give the player a motive to complete the game.
Floor storytelling
Floor
Storytelling
Prison Floor (Floor 1)
It will have the fruit running away trying to get to the next floor and at minimum bodies of other pieces of fruit that have died trying to escape will litter the floor
Execution Floor (Floor 2)
The execution floor shows the player that the vegetables are massacring them and the injustice of the situation. This is an attempt to make the player feel revengeful jumping over the bodies fruit that’s gone moldy
Veg entertainment/living quarters (Floor 3)
The player will see on the third floor how the vegetables are eating good (potentially could have bowls of fruit, eating the fruit etc) have an entertainment area and nicer living space. An attempt to make the player feel jealous or angry. Some of the fruit has killed innocent vegetables to show that some of the vegs are not evil. Maybe posters of protest in the halls
King Floor or Room (Floor 4)
This floor is then the decider where you exact your revenge on the veg king or you leave him and flee. Do you take an eye for an eye and kill him or do you spare him and change his opinion on what he’s been doing in turn creating peace.
UI Design:
The Ui is going to have a super minimalistic approach
Main Menu Screen
– Start button
– Exit Button:
– Controls Button:
Controls screen:
– Return Button
Game UI:
Win screen:
– Story decision result text
– Retry/Exit button
Lose Screen: – Retry Button
– Exit Button
Level Design:
Level 1:
Level 2:
Level 3:
Level 4:
Art Style:
The art style for “The Fruitable” or “Fruity Escape” will be whimsical and colorful with some darker undertones, befitting the theme of the game. The character design for the fruit and vegetables will be exaggerated to make them more distinct and appealing through low poly models. I’ve picked low poly because I feel like this art style aids the style of the game because realistic graphics are not needed for fruit and wouldn’t fit the theme I am going for. With the included time constraints, the models are going to be based on one fruit and vegetable which will be used for all the NPCs.
Player model = Strawberry
Enemy model = Broccoli
Sound Design:
The sound design for the game will emphasize the game’s whimsical dark-themed atmosphere. The sound effects for the bouncing, enemies, and hazards will provide appropriate feedback to the player. The background music will be cheerful and gradually increase in intensity as the player progresses through the levels.
Player movement footsteps
Player Jump/wall bounce
Player Death Sound
Player Spike death sound (fruit squish sound)
Enemy movement footsteps
Enemy death sound
Flying enemy sound
Enemy King death sound (squish)
Background music
Lofi music for the background that gets faster in tempo as the levels progress
Method of implementation:
Sprint method
Weekly blog posts that list the development that is being done throughout the project and the elements of the game that I am implementing.
Gant chart:
Constraints/ Limitations
Four floors:
The four floors is a lot to make in terms of building a well-constructed level design with the time I have so it will be hard to get the balance of making the game not have too much of a dramatic jump in difficulty. One of the reasons I picked a platformer is because it is a genre that is a basis for what a lot of players started with like Mario, Sonic and other platformers like Little Big Planet.
StoryLine:
Implementing the storyline through the environment may be hard to do with the limited time we have to implement and will focus on have core models added in through the level design that will add to he game. In example, the level design in the second level where the character reaslises the mold is from the fruit being killed and dumped into mass burials. Some things that I need to be aware of aswell is the dark themes that the game will include in terms of death and mass death at that and how this could potentially be too dark. In addition I have tried to combat that with the lighthearted element that the characters in the game are all after fruit.
Mechanics:
The permadeath system means that the general movement of the player character means it needs to be polished because of otherwise this can instantly lead to harsh frustration which is what I want to show through the harsh permadeath system.
Level Design:
Making sure that the game mechanics for the player are fluid in the game and this needs to be one of the core mechanics that work well alongside the enemies being able to kill the player. The level design needs to not be too easy so the stakes of dying and completing the games are heightened.
Minimum criteria wanted for game:
Core Mechanics
Player mechanics movement and jump/wall bounce work
Enemies can kill the player
Areas of danger can kill the player
Level Design
The levels are completable
Each level can load and the can be completed
Achievements
An achievement is rewarded at the end of each level
Difficulty/Challange
At least the permadeath system works and loads from first level instead of two game modes where one has checkpoints
Sound design
Sound design doesn’t need to be implemented as the priority is that the game mechanics work
Storyline
The storyline can be interpreted through some of the level design of each floor at a base level where the player understands the motive of the character
Models and design
The models of the player and enemy do not need to be explained
At least some of the environment models will be implemented
All the things that need to be included into the assignment:
Initial ideas development
Ability to manage project and deadlines
Development
Method Used
Clarity of the scope and final outcomes
Quality of the final outcomes
Testing
Reflection
Conclusion:
“The Fruitable” or “Fruity Escape” is a 3D platformer game that provides a balanced challenge to the player. The focus on frustration levels, immersion, and mechanics will provide an engaging experience for the player. The dark themes and colorful art style, conflicting sound design, and intriguing storyline will make “The Fruitable” or “Fruity Escape” a memorable and enjoyable game to play. Overall the project if completed within the time of the Gant chart with no issues will exhibit areas of my dissertation discussion and can be used as evidence. The main issues with the project will correctly getting all the level design of each floor implemented and working in time for the hand-in of the project. Another thing that will be hard to get right will be the sound audio in the game to project the actions of the player correctly. The animations will be another thing that will be another things to try get working correctly. However, this should support my dissertation that if the game is enjoyable the player will look past the bugs. In addition, the mechanics are fairly simple and once completed will give more time to fix all the other sections by the time it needs to be created. In conclusion, the project is achievable and hopefully come the end of the project the result will match the design work intended.
Intro: In this blog post I will be going through and evidencing where I have used the different principles of object orientated programming using C sharp.
Section 1
In this section I am going to be writing some code which is going to use constructors, constructor overloading and passing objects. What the code does is it saves the score in my basketball game and then returns that value to the
Constructors:
Constructors enable the programmer to set default values. Limit Instantiation and write code which is diverse, flexible and easy to read. Constructors are always the name of the class and can be used to set parameters for values in a class.
Constructor Overloading:
This is when a constructor is changed or redefined in one or more forms. This is implemented when defining multiple constructors that share the same class name. OOP using c sharp can define different constructors by signatures however the different constructors must have different parameter lists.
Namespaces: Namespaces are used to define scripts into different directories to quicken run times of code. For example if I had door opening and core mechanics scripts, these would be divided into the respect groups. This way it is easier to sort through and later adjust if problems with code happens.
Passing Objects:
Passing objects is passing values or parameters through an object thus passing the whole container of information rather than bits of information at a time. This can work by using objects as containers to pass functions, variables and methods through.
Public Parameters:
Public parameter means that the value that has beens stated can be accessed by any script in the console. For example making a public class means that class can be called or used within other classes.
Private Parameters:
Private parameter means that the stated variable can only be called and accessed within the class it was used in. Private variables are specific to that class and methods used within the class and cannot be accessed or used outside of that class.
Protected Parameters: Protected classes/methods variables cannot be changed outside of the class however they can be called and used in other classes (methods etc)
Declaration: talks about what is in the class and what it does
Instantiation: Creates and fills In the details in that class
Evidence
Image
Description
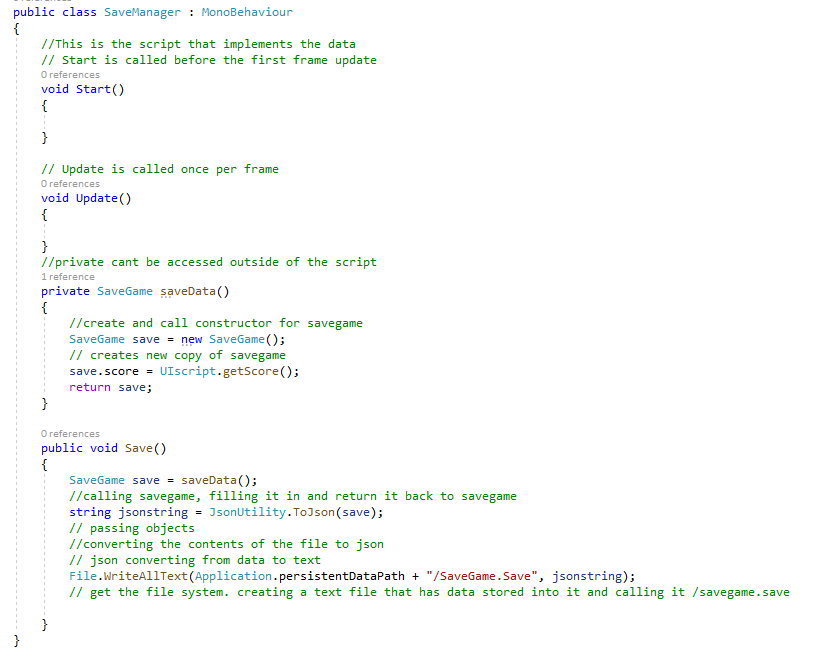
Constructor Ref: 1a
Firstly, constructors have the same name as the class. Here you can see that I have created a constructor that will create an object in memory. The constructor is going to use the int variable score and position of the ball.
ConstrutorOverloading Use of “this” Ref: 1b
This is the second constructor which is possible because it holds the int score value unlike the first constructor, if it didn’t reference this value it wouldn’t work. Inside the SaveGame Constructor “This”(this means relating to the file its stored in) score = score means its storing the value which is in the UI script (this is possible because that score int value is static meaning its the same throughout the program) Whatever score that is given ~ You provide different, format and different ways of running something, void save game no data, void save game, can either create it and pass no information or we could pass all the values we need
Namespacing Ref:1c
Now I am going to create a script called SaveManager which is going to save the values from the save game and convert them from a numerical value to string. Json can be used for converting values from float/int to string/text. Firstly I need to use the namespace which accesses that input which is “using System.IO;”. In Edit>Project Settings>Editor>Root Namespace, I am going to create a root namespace to start editing in visual studio.
Collection of code accessing
Private Variable Construtor Ref:1d
We are now going to reference the constructor that’s in the first example, which we are now going to store a value into by creating a function “saveData()”. In the next line we are going to create a save followed by the score value being saved from the getScore() function from the UI script. The private variable means that only this function can be called in this class.
Passing Objects Ref: 1e
Now, I have created a save function and in the first line I want the save to reference the new save game in saveData() function. In the next line I am converting the save from a numerical value from score(eg UIscript static score int) to string using Json. Json is used when converting values into string and this is where I am passing my values from json back to the SaveGame constructor. *to avoid passing each individual bit of information, the object is passed as a whole.
Class declaration and instantiation Ref: 1f
Declaring what the class can do, the information it has and what it can do. Instantiating is to create it in memory Here in this code, I have created and declared my class SaveGame class. Next I am instantiating the class by calling the class name as a method. This method is going to act as a container in memory for the object so I can be defined in other classes.
Section 1 Images
Reference
Image
1a
1b
1c
1d
1e
1f
Footsteps script
If and switch statement:
If is a conditional statement which is used on the basis “if” a condition is met then it will execute a line or series of code. If statements work is alignment with boolean true and false values and this is how it can be manipulated in code. Switch statements on the other hand are different, they can be used in altering which and how a method/line of code is executed. This is controlled by different case labels which return different values depending on the conditions set normally using boolean, enum or string.
Reference
Image
Evidence
2a
In this script I had two different footsteps sounds which I wanted to alternate between, to give the effect of the player walking. This was done using if and switch statements. The if checks the character controller (“cc”) attached to the player is grounded, if that is true the sound will play the first audio clip, if it is false it will play the second audio clip. The switch statement is in between my if statements then states the true and false audio clips to be played when either true or false. Below the second if statement within the first true if statement, it grabs the audio source and uses PlayOneShot which will play the audio clip one.
Reference
Image
2a
UIscript
Enumerators: Enumerators can be used in different ways by using types or using them as a coroutine. Enumerators let you define your own variables and types. For example if I did a compass, I would define the directions in the “North, East, South, West” then in a referenced function I could define the direction to face north if turned round the wrong way so the player would be facing the desired way.
Reference
Image
Evidence
3a
Here I have set up an enumerator to have two variables of controls which the player can choose to play the game. Keyboard uses simple base controls that are used in unity (“W,A,S,D”) and the other is controlled by mouse. In the code I have defined a public controller so that it can be manipulated in the inspector of the “Playerscript”. This sets up a simple if statement using true if the player is using keyboard and (“else”) false if the player is using mouse.
Reference
Image
3a
Health Script
Testing a class
Debug.Log: When testing variables in a function/method in a game, commonly used is the “Debug.Log” parentheses to return something to the console. This can be used to test a multitude of different things based within the code. For example if I wanted to check if a raycast is hitting a target, I can use debug.log to to return when the raycast has hit an specific object.
Unit testing
Reference
Image
Evidence
4a
This is my health script for inside my zombie shooter game, what I’m trying to do here in the damage function is to return a number to the console, the number of enemies the player has killed. I did this because in my game, the number of enemies killed is dependent on a door opening to each room, by checking the amount of enemies it tells me if the door is working correctly when the correct number of enemies are dead. When the enemy dies, this updates the console with every kill using a string “Amount Killed” and my function in the gamemanager script. This will then update the amount killed plus the number of enemies killed.
4b
Unit testing
Need to ask simon about asking what to do with unit testing Unit testing is a series of tests that tests each part of the game and gives feedback to when something does not work. This is used when implementing new things into the game and if it doesn’t work it’s easier to track back and see what parts of the game it is breaking. This helps with the speed of development and is best practice to implement when each section of the project is completed. In example, this would be used if I was checking the controls of the player and how that works.
Static variable is something that cannot be changed and will stay the same throughout all instances of implementation. Like in this example, Inside the UIscript a static integer of score has been declared because I want this to stay the same throughout every instance of the classes and this can be accessed directly. This is then updated in the health score which is referencing the script and the method it is attached to, it will increment 50 points to the score. SpawnScript – static int, how many zombies have spawned. Will keep the zombies the same throughout each spawn spawn, Each spawn will share the same value
5b
Reference
Image
5a
5b
Getter and Setters
Reference
Image
Evidence
6a
Here I have added a get and set to speed of my ball because I want the ball to have a set speed. What I am getting is less than equal to speed. The speed value is then set if the value is less and equal to the value of ten. Get and set method is simple really, this gives the ability with scripting to controls values, how they are used and when they will be used/
Reference
Image
6a
Protected Method
A protected method makes a method only accessible within the class and subclass it has been referenced in. Different to public it cannot be called outside of these class/subclasses and is used when you don’t want it accessible by the whole program.
Scripts: Rotator, RotatorChilD
Reference
Image
Evidence
7a
rotator Rotator child
The protected method is being called in the rotator class so it cannot be called outside of the class. In the second script the rotator child is inherited from the rotator parent class and becomes a subclass of the rotator script. So when the protected method is called in the child class of the parent it can be correctly referenced.
Reference
Image
7a
Inheritance
Scripts: Rotator, RotatorChild
The script is using the rotator class and inheriting the rotator child class and changing the colour of the collectable pick up material colour to red.
Reference
Image
Evidence
8a
I am going to set up the rotator as the main parent class and use the second rotator class as a child in this example of inheritance. In the RotatorChild script I adjusted the class to inherit from the “rotator” class rather than inheriting from monobehaviour. Changing it from monobehaviour means that it will inherit from the main class and the rotator class is a child, so when this is applied to the pick up object then it means that the class will take the code from the rotator class and add the code in the rotator child. In the child script it will change the material of the object to red.
Reference
Image
8a
Polymorphism
I have not added this but I am going to explain how this would be added into the class
Polymorphism is simple to understand, in greek it means to have more than one form. It is used when wanting to separate classes that use inheritance, this gives the ability to the programmer to give the class more than one type. This feature means you can set any child class to be a parent class, this is normally used in some sort of hierarchy. In example, if you had an attack base and 2 classes derived from attack with different forms of attacking, melee and range. Then you could have the two different classes inherit the others ability if the enemy powered up. However, only the attack is a range type and not range is an attack type. This means when writing code in a script, if I call a method or code, the class will decide how it’s used with how it’s been called. If I created a new class of an enemy and instantiated that into the scene, I could use polymorphism to identify that enemy using ranged/melee so its much easier and simpler to implement into the scene; this saves code and optimises the game better.
If I was going to apply this to my project, I would add this with two different types of enemies like I have done with my attack example. I would have two types of enemies, fast and slow type of enemy which would derive from zombie which thus derives from zombie.
Reference
Image
8a
Custom Namespace –
Reference
Image
Evidence
9a
Custom namespaces are used when to section off and access code when it is called for in a script. It helps organise and separate parts of code for more comprehensive projects. Here I have added a namespace (“savegame”) for my save game function, as I only want the save manager to access this bit of code In savegame class. Like unity uses namespaces to access directories of codes (eg using unity engine), using savegame because of the namespace created now can be used in the same manner. If I didn’t add the namespace into the script then the save manager would not be able to access the save game constructors.
Reference
Image
9a
Loops –
Create a loop to see if the amount picks ups to give win condition
Reference
Image
Evidence
10a
First two evidence is for loops, ..Loops in programming are a way of repeating actions or events. The way the for loop works is by creating a number of controllable number of interactions. This is normally followed by conditions in the loop, if met will carry out the instructions in the loop.Here I have written two “for” loops that are intended to create a wall of bricks using a gameobject saved as a prefab. These bricks are then instantiated into the scene and incremented to the amount of blocks width and height declared under the public game object block. In addition to this I wanted each block to be made up of different colours. So before the loops in the start function I added an array including the main rgb colours. Inside the loop then I added a “ran” to randomise the amount between the three colours.
10b
For each loop is normally used with arrays and enumerators but in this case it is looping for each mesh renderer cube colour and logging each colour in the console. For each is not much different to for loops, it normally has a boolean condition that if met will do the action/event inside the loop. This is looping, meshrender and logging the colours of of each mesh material cube which is spawned The for
Reference
Image
10a
10b
Test suite
Reference
Image
Evidence
11a
Firstly, I made a risk table which I can depict how much of a problem that a certain bug will affect the gameplay. A standard test suite will go through the comprehensive testing of each element in the game (e.g. player, User Interface, objects in game, general tests and so forth). Test suites will break down each part and test the main elements depicting the subject, what and how is being tested, did it work and risk.
Reference
Image
11a
Uml Diagram
Game: Roll – A – Ball
Reference
Image
Evidence
12a
Uml diagrams are visual representations of how the classes interact with each other. This makes it easier to understand how a program runs and how to add or take away from it without messing with the game. Here you can see that the game mainly routes back to the player script being the main script in this game.
Critical analysis of virtual and mixed reality platforms
Introduction: In this assignment I will be academically analysing the differences/similarities between Virtual and augmented reality headsets and softwares; What are the differences between each platform and the best use purpose for each platform. I will be focusing on the following principles; visual and graphical quality, interaction methods, scope and availability of experiences, performance and requirements & challenges and differences between the platforms. I will only be addressing the main equipment which is appropriate to the discussed platform.
Sections
What is virtual and mixed reality?
1a. Availability of experiences
1b. Experiences and uses for virtual reality/augmented reality
Equipment to be discussed
2b. Headset Based Vr
What is virtual and mixed reality?
Virtual/Mixed reality definition is defined by simulating a computer generated three dimensional world space, that’s either generating models through a phone camera tracking real world surroundings or realistic interactions, through headset hardware using hand tracking controls. Each piece of equipment is used and designed differently for each experience that is available, these types of experiences vary through the different devices available to deliver the specific needs for each purpose. In modern society, these experiences have been integrated over the past ten years into a daily use like snapchat filters tracking faces and applying filters using augmented reality and other experiences like AR being used in tv broadcasting events like in UFC projecting information over real world spaces (In this case, In an arena).
1a. Availability of experiences
Type of AR/VR
Headset based virtual realityOculus Rift S, Oculus Rift, Oculus Quest, Oculus Quest 2HTC Vive, HTC Cosmos, HTC Elite, HTC, Vive FocusValve IndexWindows MR, Windows HP Reverb G2Playstation VR
Mobile Based virtual realityGoogle Cardboard/DaydreamGear Vr/ Oculus Go
Phone based Augmented realityARkit ARcoreVuforia
Headset Based augmented realityMagicLeapMicrosoft Hololens
1b. Experiences and uses for virtual reality/Augmented reality
How can virtual and mixed reality be used commercially?
Education: Using virtual reality to teach in a 3d world space environment to help stimulate and exercise procedures without real world learning. This has been used to teach first responders in teaching the correct procedures without risks in a user friendly way, for example this can be used to simulate fire hazard safety to training doctors for medical procedures.
Retail: Augmented reality can be used in a multitude of ways and Ikea has capitalised on this same concept. Instead of worrying if a sofa will fit in a home, on the ikea app it can be used to simulate how the furniture would look/fit in a real world setting through your phone.
Game Industry: Games In VR are a more personal and diverse experience to the traditional way of playing games. The games industry is pushing different ways now the player can be in the world in a game. For example, horror experiences like “Half Life: Alyx” and “Walking Deads: Saints and Sinners” can put you in a more immersive experience that cannot be replicated looking at a 2D scene.
Architecture and VR tour: VR can now be used to simulate experiences with selling/renting homes on the market without needing to visit the property in person. This makes it easier for the consumer and company especially with the recent pandemic, virtual viewings have took a significant rise
Vr Event: Gear VR has been used to hold virtual events like comedy shows, live sports and other entertainment outlets.
Medicine: Virtual reality can be used to aid some types of medical procedures and recoveries. Ex-soldiers of war who suffer with PTSD from traumatic events can go through a series of virtual simulations to help with recovering in therapy.
Equipment to be discussed
Headset Based VR
Oculus Rift
HTC Vive
Windows MR
Valve Index
Mobile based VR
Google Cardboard/ Daydream,
Gear Vr / Oculus Go
Phone based AR
ARkit
ARcore
Headset based AR
Magicleap
Microsoft Hololens
Oculus Quest
2b. HeadSet based VR
Headset
Strengths
Weaknesses
High Range (Valve Index, HTC Vive, Oculus Rift)
Use of infrared sensors for accurate positional body tracking between headset and controllersThe headset is specifically designed for comfort with adjustable interpupillary distance between lenses for personalised head shape/eye placement requirements. Also designed to be worn for extended periods of time with cushioning and secure fit with velcro straps. This helps with a more personalised and comfortable enhanced experience.When buttons are touched or pressed the controller tracks the hands and hand placement for more immersive in game experience.Headsets are fitted with cameras on the outside for better world tracking and more accurate positional body trackingThe headset has the most experiences available and best for game based experiences
Can induce motion sickness and loss of balanceRequires a big play area to avoid bumping into walls/other objectsStudies suggest that children can find it hard to understand between virtual and real world eventsOnly select games are optimised to use the valve knucklesEach headset equipment is expensiveCan only be used with a high powered pc ready for virtual realitySome games optimisation can affect gameplay with different headsets, for example beatsaber can skip frames with oculus rift but runs better with HTC Vive.
Mid Range – low (Windows MR, Playstation Vr)
Well designed headset for a cheap priceInterpupillary distance can be changed but it is not as smooth unlike higher end modelsThe windows MR headset can run on less powerful computer setups
Windows MR only uses cameras to track controllers and requires well lit room to trackLess intuitive camera and sensors meaning if hand placed behind head, will stop trackingThe headsets have lower resolution and general comfort/fit is worsePSVR only works with the playstation and motion control are sold seperate.
Principles
Visual and graphical quality
Strengths – Headset based VR has the best visual and graphical quality for gaming amongst other entertainment sources.Has the highest output of consistent frame rate and resolution compared to other headset based VR (Oculus Go, Gear VR)More precise calibration for for comfort and visuals w changeable height and interpupillary distanceWires are easy to set up and runs through HDMI Weaknesses – Games need to be optimised well to get the best out of visual and graphical quality, if the models have too many polygons it can cause frame rate drops and affect comfort (induce motion sickness)When the game is run through the headset, it needs to be duplicated through each lense for each eye. Duplicating the game puts heavy amount of output on processing logic so it requires a high powered
Interaction methods
Strengths -Cameras or sensors placed in the room can track the controllers for a more efficient body tracking Valve knuckles adds extra immersion when picking up objects, depending on the weight that is applied to how hard to trigger resistance isPrecise infrared tracking Moving round the world space can induce motion sickness but this can be countered by efficient design using teleporting or narrowed vision when moving Weaknesses – Teleporting for movement in virtual reality is the best and least likely to cause discomfort (motion sickness) however it breaks immersion. Third party software like the 3D rudder has been made to counter this except it is third party hardware and is not properly supportedControllers like the Valve knuckles are a better concept for controllers and immersion but not enough games support themSetting up the play area and calibrating the headset can sometimes be tedious and if the correct settings (height of player, interpupillary distance) are inputted wrong it can be disorientating.
Scope and availability of experiences
Strengths – Headset based vr has the most availability for experiences and developing because it is the most successful and developed platform. The platform is best fitted for bigger experiences like games such as “Walking dead: Saints and Sinners” and “Half Life: ALYX”.Universal developer tools are easily accessible and can be used in the biggest engines (Unreal engine, Unity Engine) to create VR experiences. VRTK/SteamVR offers easy and accessible demonstrations of interaction methods to develop, however these dev kits still face some ongoing issues.Virtual reality is still expanding and becoming a viable source for funding and revenue, it has been proven that over time the industry is getting bigger and being populated with more experiences Leading virtual reality headset developers are ever expanding new designs for headsets and tailoring experiences for a more affordable price.Weaknesses – Headsets in the UK are becoming more available however some experiences like the valve index are quickly sold out. Older headset models can become outdated and once the next headset like Oculus Rift S and HTC VIVE Cosmos, they don’t sell older models.Companies are still working on ways to make good experiences for lower prices with the same availability of experiences
Performance requirements and challenges
Engines and dev kits (e.g. SteamVR) are always updating with new versions and changing how they function. However this comes at a price, the new patches can affect old projects so they do not work properlyFrame rate is important and must be in between 70-90 to stop discomfortIt requires a powerful PC with a HDMI slot to use the equipment because of the game being duplicated for each lense.If a game is optimised poorly it can induce dizziness, nausea and motion sickness. Health and safety needs to be considered in every aspect of a vr game. Vr experiences tend to be very short because of the cost and development time needed to make them. This can be very expensive however few experiences that push the boundaries exist like Half life: Alyx which is 8 hours long.VR cannot be played for a long time and the player needs constant breaks for health safety reasonsNeed a large play area to use the equipment efficiently
2c. Mobile based virtual reality
Mobile Based virtual reality
Headset
Strengths
Weaknesses
High Range (Gear Vr, Oculus Go, Google Daydream)
Variety of entertainment experiences including games, shows and virtual eventsOculus go Does not require a phoneAvailability of live event experiences using through 360 cameras (e.g sports like ufc)Controlled by basic controller or buttons on side of headset
Oculus Go has been discontinued Lower res on lensesLimited amount of experiences and support for platform
Mid Range – low (Gear Vr,Google cardboard)
Google cardboard is open source to use and develop with even though its limitedLightweight design and cheap
Support for Samsung gear vr has been stopped on latest phone models Only usable for 360 videos
Strengths There are games on the Oculus Go/Gear VR that are made well. Including titles like Minecraft Gear vr edition WeaknessesOculus go uses processing power similar to a phone which in turn suffers with frame rate and resolution affecting graphical qualityLimitations of the phone means it has significantly less resolution and affects visual qualityOnly few software is adapted with sub standard visual quality
Interaction methods
Strengths Has a remote control or buttons on side of headset to navigate menus or control experiences Simple and easy to understand control system WeaknessesThe simple controls limit the things can be done with the hardwareButtons on the side can be unresponsive and fiddly to use with navigating applications
Scope and availability of experiences
StrengthsEasy to demonstrate and portability of experience mainly used for 360 videos and VR tours.The headsets are significantly cheaper than other experiencesGood for simple demonstrations at shows for example c exhibitions showing of demonstrations of services at the college/flats tours and educational purposes WeaknessesLife cycle of gear vr and oculus go stopped productionOnly using a phone limits the experiences available
Performance requirements and challenges
Controller button layouts are simple and hard to adjust for more complex experiences. Also because a phone is doing all the processing power it is hard to adjust games to run effectively on these devices. The models have to be drastically reduced and interactions reduced. However the controllers make it hard to navigate the menus and general interaction. However some games have been adapted like minecraft
2d. Headset Based Augmented Reality
Headset
Strengths
Weaknesses
High Range (Microsoft Hololens, Magic Leap and Oculus Rift S)
The headset tracks the cursor using eyes and hand gestures used to open menu and navigate settingsCameras placed on the headset for positional placement and real world scanningCan use voice activated controlsAugmented reality has been mixed with headset based VR to reduce the sensors needed to track hand and body position. This has improved overall safety for play areas, for example if the player’s hand or headset reaches the end of play area it will revert to real world vision until play enters play area again. This helps keep track of where the player is.
The headset has a heavy design which weighs on the bridge of consumers nose Limited software support Still in development for practical everyday usesUsing hand for control can be tedious and unresponsiveVoice activation not yet perfect for each accent (e.g scottish)
Principles
Visual and graphical quality
The headset graphics and quality is not great and has low latency/resolution for the magic leap and microsoft hololens. This is because it is running a mid range computer through the headset. The User interface is small on the magic leap and microsoft which makes it harder to see clearly what is being done. Games are limited due to the low latency and graphical low resolution. However Oculus go is not affected because its still connected to a computer to give much better performance but less portability.
Interaction methods
The magic leap and hololens is difficult to use sometimes because the hand tracking of the gestures to open the menu or select something can be unresponsive. Also the same GUI makes it harder to select and navigate through the menu/applications
Scope and availability of experiences
The headsets software support is still limited and the headsets are still being developed to optimise the practical use of them. The purpose of them is to create futuristic designs to help the everyday person and experts, In example being able to see a blueprint map on the wall as an electrician is trying to rewire a circuit.
Performance requirements and challenges
The headset requires a lot of power using the technology that it uses and still isn’t efficient in the amount of battery that it uses leading to only a max of 2-3 hours battery life. Also the weight and design still is too heavy for the hardware making it uncomfortable for the consumer.
2e. Mobile based augmented reality
Mobile based ar
ARcore/ARkit
ARcore is google’s development kit for AR, a combination of different api which make it possible for your phone to sense its environment and understand it. It’s three main principles are motion tracking, light estimation and environmental understanding. AR is used much more than we all realise in everyday apps like the selfies we take in snap chat. ARcore is compatible with android and ios.
Headset
Strengths
Weaknesses
High range mobile AR (samsung note 10, Iphone 12)
ArZone is used for android and can track a person’s face, create an avatar and react with real world facial expressions.Snapchat, Instagram and other AR based cameras can impose cartoons or effects on persons face by the camera tracking itApples AR can use real world scanning to take 3D images and create models
Only high end phones can effectively get use out of more advanced AR technologyARzone is not as advanced as Apple’s AR.AR games do exist for phones; there are not a lot out on the market and are mainly used for cameras. These games include pokemon GO and etc
3. Differences and similarities between platforms
Differences and similarities between platforms?
Platforms
Differences
Similarities
Headset Based VR
commercially used for best vr experiences Majority male populated audienceUsed to help with education and medicineCan set interpupillary distance and optimise for height
All platforms use positional trackingMost headsets have adjustable straps for optimal configurationHeadset based VR now uses Headset based vr cameras and real world trackingBoth has games on the store that can be played
Mobile Based VR
Uses a controller to navigate systemUsed commercially for games and vr tours
Mobile based ar and vr games Can be used for demonstrations (virtual house viewings) and vr events (ufc events)
Mobile Based AR
Women aged 18- 24 use AR more (etc instagram and snapchat selfies)Used commercially for vr tours, for example using
Used for as tool for testing ar gamesCamera can track and scan in world objects
Headset Based AR
In development for professional work and planning.
Introduction: In this development log I will be setting up and importing objects into the game and explaining my reasoning behind those choices. This log will go through the development, risk and testing of the game and how plausible it is.
Sections
Development log
Risk table
Testing
Development log
Reference
Image
Description
1a
Firstly, I imported a basketball into the scene and we are going to add some stream vr scripts later to the object so it’s usable in a VR setting. Then I made a basketball holder to hold the basketball. Not shown in the image but I also elongated the holder so it’s easier and more accessible to the player. After that I need to create a physics material to apply to the ball so the ball bounces off the backboard. In doing this, I also made the rigidbody mass of the ball lighter so it’s more lightweight and easier to throw.Imported basketball and basketball hoop from 3ds max which I created for the game. I also added box colliders to the hoop so the ball doesn’t go straight through the hoop, however this is in a box shape which is not the shape of the hoop and can affect the realism. I did this by selecting the hoop object and making multiple box colliders round the rim of the hoop.It’s hard to make the physics of the ball correct for throwing the basketball so instead I am going to make the backboard smaller than normal and make the hoop bigger so it’s easier to score points. However changing the physics and the size of the hoop makes the realism experience less effective but more plausible for VR.
1b
The player script is used for the player controller and is its own prefab that is easily dragged and dropped into the scene from the steam vr plugin; this covers all the logic behind controlling the player and setting up the headset/hand controls. In this case I am going to use the prebuilt controls and not make any modifications to that.Basketball added with interactable and throwable scripts attached. The added scripts to the basketball comes with the steam vr plugin. The scripts react in the way they are named, this makes the ball interactable and throwable in the scene. So now I can test the physics and rigidbody mass of the ball when throwing the basketball.
1c
Teleporting (added into the scene as an object).Added teleport area to floorOne problem that I have had with this is the floor will disappear so I might just leave this out later on in development and keep the player rooted to the same spot. In my design I chose not to use this because of possible health and safety precautions with motion sickness and also I did not plan to use this.
UI panel set up inside the scene, attached a canvas to an object in the scene to show time and score; effectively the object acts as a background to the score and time text so it’s more clearly displayed. To make the canvas visible in the scene I adjusted the canvas render mode to world space. Attached a GameManager script to store values for score and time with a boolean for when the game is “won”. The won boolean will be true when the timer counts up to sixty and the game will stop and return to the main menu. Added UIscript which references the add score function and to update the time and score text. The score can now be referenced in a different script referencing the UIscript “addscore” function.The ball script which adds points when a basketball is collided with addscore objects boxcollider; this sits underneath the hoop to be triggered when a ball goes through. This is added by calling the UIscript add score function. The basketball uses a tag “BasketB” which is referenced when
1d
Adding a main menu in a new scene, with two bins instead of having buttons. Bin 1 will start the game and bin 2 will quit the application. Each bin has a collider in with its own script attached which either starts the game or quits the game. I added a canvas like I did for the score to a game object, holding the canvas. Adding text, I created a panel for the control, start/quit and title for the game. Next, I want to create a script that is going to spawn the ball back to its original place where the player can pick it up. I did this by creating two scripts, one which is a placeholder for the ball to respawn (I reused the same spawn script that I used in my zombie game) and a collider trigger on the floor to destroy the ball. Originally I tried to just instatiante the game object to spawn when the position of the spawn point but because I didn’t set any variables for the ball, it just spawned a ball every frame which overloaded the game leading it to crash. What I needed to set was a delay between spawns and a time for the next basketball to spawn so when the basketball is destroyed it can spawn another. The enemy die function makes it possible so I can reference that in the other script attached to the floor, it updates the scene to the amount of the game objects(basketballs) in the scene. Leading onto the next script FloorDestroy. FloorDestroy uses a collider and tag so when the basketball hits the collider it calls the enemy die function, destroys the basketball and updates the amount of basketballs in the scene. This was the script is less intensive on the game and runs a lot more smoothly which is a priority for VR because it demands so much, every script needs to be optimised.
1e
Now all I need to do is make a few slight adjustments to some of my scripts and add the spawn script/Floor destroy to the main game scene. I am going to apply what I did in the main menu scene with the ball respawning and apply that to the floor in the scene of my main game
1f
Working at university, I have had a few issues trying to get my scenes to work. The hand controllers were not tracking. I reimported steam vr and the hands are still not being tracked. I don’t know if this is a difference between
Risk table
Risk table
1 – A game breaking bug that makes the game unplayable or breaks the game
2 – Is a significant bug that affects the gameplay but does not make the game unplayable
3 – A small bug that is noticeable but has no effect on gameplay
4 – Works as intended and is passable
Testing table
Testing
Subject
What am I testing and how?
Did it work?
Risk
Player
Motion sickness and transitions between main menu and main game
In this I am going to be testing the transitions between the main menu and the main game. How quick quick is the transition and does it make the player feel sick
The transition is almost instant and can create a little bit of nausea so effectively it did not work as intended but is not a game breaking bug. It is just a health and safety hazard. The switch from white to white needs to change to black
2
Player positioning in main menu
Is the players position close enough to the ball in the main scene and is it possible for the player to shoot the ball into the bins to start the game
This works perfectly fine and the positioning is not too far from the ball and the bins are not to far away
4
Player positioning in main game
Does the player positioning in the main game have enough space but close enough to the basketball/ hoop to pick up and score
The player position is slightly too close to the where the ball holder is and can clip inside the ball holder if too close. However the player is a near enough distance to shoot the ball however the three point effect
3
Player controls
Can the player pick up the ball, look round the scene and throw the ball as intended.
This all works perfectly as intended
4
Player height in the scene
Is the players height in the scene accessible for all of the game objects?
The game objects are either too small or too big, for instance, in the main menu where the ball spawns is too low and where the ball is in the main main is much higher. It’s a bit strange for the player.
3
Can the player score and how easy is it too
Is the physics of the ball correct, how easy is it for the player to score and can the player score.
The player can score with relative ease after getting the rhythm down of throwing the ball. However the physics of the ball is a bit off and does not feel realistic,
3
Can the player start the game
When the ball hits the main menu start box does it start the game?
When the ball hits the start game collider, it starts the game
4
Can the player quit the game
When the ball hits the main menu quit box, does it quit the game?
Yes, when the ball hits the collider for quit box collider it quits the game
4
UI
Is the score displayed clearly and visible
Is the score text easily understandable, is it close enough to the player to read it and how well is it displayed
The text is close enough to the player and is easily understandable with the way its displayed
4
Is the time text displayed and clearly visible
Is the Time text easily understandable and is it close enough to the to read it and how well is it displayed
The time text is close enough to the player and is easily understandable
4
Does the score count up
When the ball hits the scoreadd collider does it add 1 to the score
When the ball collides with the scoreadd collider it adds one to the score
4
Does the time count up
When the main game starts does the timer start
The timer starts in the main menu so when starting the game in main game it is already counting up
2
Is the main menu text visible and easy to understand
Is the text inside the main menu visible, displayed well and easy to understand
The text inside the main menu is visible, easy to understand and displayed well
4
Objects in game
Are the objects in the game a realistic size
Are all of the objects in the game scene of a realistic size
The basketball seems a little too big and the basketball hoop is of a weird size. They are aren’t very realistic which takes away from the experience
3
Can the basketball be picked up
Is it possible for the player to pick up the ball?
The basketball is easily picked up
4
Are the basketball physics realistic and can basketball be thrown
Is the physics applied to the ball realistic and how accurate is the ball being thrown to the real world
The ball seems abit too unrealistic and heavy, this makes it harder to throw the ball but it is still possible once use to it
3
Does the basketball respawn when the basketball hits the floor
When the basketball hits the floor, is the basketball respawned to its starting position
When the ball hits the floor it is respawned to its original position
4
Does the basketball holder work effectively
Does the basketball holder carry the basketball without the basketball falling through it
The basketball works holds the ball without it fall through it
4
Does all the skins for the objects appear properly
Does all of the skins for the models appear in the game properly and do they look good
All of the models skins are correctly displayed and there is no problems
4
General game tests
Can the game start
Does the game start
Yes
4
Can the player quit the game
Does the game quit
Yes
4
Can the ball fall off the scene
When the ball is thrown can the player throw it out of area and the ball does not respawn
When the ball is thrown out of area it does not respawn and the game has to be manually quitted
1
If the player returns to main menu and starts a game again does it work correctly
When the player has completed and game and returns to the main menu, when he starts a second game does it restart the score and time values or does it work strangely
The game when restarted does not reset the values for the score and time and works in a really strange manner. Leading to the game needing to be quit before the game can be played again properly
1
Does the game end when the time reaches sixty seconds
When the timer reaches 60 seconds is the player returned to the main menu
When the timer reaches 60 seconds the player is returned to the main menu
4
Health and safety
Motion Sickness
Does the player feel motion sickness when playing the game
The only thing which would make the player feel motion sick is the transitions from being transported from the main menu to the main game. However the player
3
Hitting surroundings and muscle strain
When the player is throwing the ball, are considerations made for the player hitting surroundings or inducing muscle strain throwing the ball
Throwing the ball might be fatigued if the game is played for a long time but thats why there is a 60 second timer to slow down and stop the player from potential injury. Also, the player is rooted to the spot to reduce potential hitting of surroundings near the player
4
Is the game optimised for vr
Are there too many objects in the scene and does the frame rate drop
There are not many objects and variables in the scene so the frame rate does not drop. However if not using a powerful pc designed for vr then potentially the framerate could drop
Introduction: In this post I will be creating and planning ideas around a game for virtual reality and the challenges that come with creating games for this platform. Vr based headsets are much harder to design for and have many limitations that come with developing for the platform, I will be researching how to develop my game so It is easier on the player and reduces the possibility of health and safety flaws to the game like motion sickness, spacial awareness and over safety for the player.
Sections
Ideas
Which Idea have I picked?
Considerations and limitations
Ideas
Idea 1 – A brick breaker inspired game which works like Xbox kinect rally and the player uses his hands to hit the ball back and forth is an enclosed space to destroy all the bricks beating the game.
Idea 2 – A basketball game where the player tries to score as many points as possible in a minute by throwing the ball through the hoop.
Idea 3 – A omnipresence game where the player is godzilla and destroys a city to stack up points
Which Idea have I picked? (Idea 2)
I picked idea two because it is the most simple concept and will have less health and safety features to account for making it easier for my first VR game that I am going to be developing. Also the idea has less serious programming to add into the game to get it to work
Considerations and limitations of designing for comfort in virtual reality?
Locomotion Sickness –
Locamation sickness is a very serious thing when considering health and safety using virtual reality. This can be from moving objects in the game or how a player moves in a game which can induce nausea, dizziness and vomiting. The concept of using a joystick to move without your body can affect your sense of balance when your body knows you’re are stationary. This can be limited by the the way motion is used with movement, like using teleportation because it gives time for your brain that you moving to a
Importance of frame rate –
Optimal frame rate for virtual reality to run at a comfortable speed without inducing motion sickness is 90-120 frames per second. This is because the headset is duplicating the game for each lense that covers each eye. There are some variables to avoid which will harm the refresh rate, Scenes that require dependant renderers, including shadows and reflections (ray tracing etc), Unoptimised models or objects with a high amount of vertices, pixel intensive lighting and mass pixel loading (eg transparency, multi-mass shaders), significantly large texture loads and skinned textures. So, to increase comfort and reduce discomfort it is advised that the code/graphics is simplified rather and optimised rather than high complexity which is heavy on CPU performance and visual quality.
Different use of user interface in game (comfort) –
Virtual reality has more challenges when it comes to displaying UI effectively than creating a 2D based surface. 2 – 5 metres away from the player for comfortability when looking at UI is optimal when reading and presenting UI text. Adding In parallax effects where the text/menus is less desirable and better displayed when they are flatter together. Having the UI in viewing distance of the player so the player does not have to turn his head so if something happens the player can realise it’s happening, this makes it more comfortable for the player. UI canvas’s also need to be displayed in the world space because the way the resolution is optimised for vr.
In a three point game held by the NBA each year is where a person shoots 5 balls from 5 different spots located round the semi circle surrounding the basketball hoop. The aim is to get as high of a score as possible by shooting as many baskets as possible. This game is timed for 60 seconds to score as many times as possible
Arcade machine –
Arcade machines are simple, the player stands in one place and shoots from a standing position to score as many points as possible in 30-60 seconds.
Other games based round basketball Ideas –
VR sports challenge
This is a series of sports games which one of them is a VR simulation of a basketball game, however they added in a bunch of different modes(dunk contest, actual basketball game and 3 point shoot off). One of them being a three point game which is something which I can base my game off.
What this game does in the 3 point challenge is the player is rooted to a set position where he shoots the balls from each of the 5 points. The interactions of the ball and the hoop responding to the score makes the game rewardable and interesting(ball sets on fire if scored 5 in a row).
Elaborated Idea –
A basketball game where the player is rooted to one position like in the arcade machine research but it is set up like a three point game where the player is further away from the hoop. I want a simple timer like in the NBA 3 point game where the player has 60 seconds to score as many baskets as possible so this will solely focus on grabbing, shooting and scoring. I wanted the score to be displayed in the world space like talked about in considerations, A fixed UI attached to the players vision can be annoying, off putting and uncomfortable for the vision of the player.
Level Design
Main Menu –
Main Game –
Objects in game –
Objects in game –
Object
Description
What does it do?
Player
Controls
The controls for the player and how he uses them, how are the controls applied
The player will use basic controls to pick the ball and shoot, this will be using the triggers located on the back of the controller.
Movement
Movement within the game
There is no movement for the player involved which will further minimise any effects of motion sickness. The player will be rooted to a base position. This way there is no acceleration or deceleration applied to the player and makes it easier for the player to comprehend. Steam vr has base scripts which are used for throwable and interaction which will be applied to the object.
Basketball
Physics
This is the way that the ball will be thrown and the effects that are applied to the ball.
The ball will have a rigid body with an adjusted mass so the ball has some gravity and weight attached to it,
Adding points and multiple purpose of the ball
The different uses for the ball and why it has been used this way
The ball is being used as the base object to transport from the main menu to the main game and also to add points when colliding with the add score. This minimalises the need for different features with the UI and is more designed for virtual reality
Basketball Hoop
General uses
The basketball hoops general uses and what it does
The basketball hoop is the object the player is trying to score into the hoop. This is a static object in the game which is the main obstacle with scoring
Realism and size
The size of the basketball hoop and base. Why has it been adjusted and how does this apply to vr
The size of the hoop and basketball base is going to be shortened and the hoop made bigger so it’s easier for the player to score. This takes away from realism to the game but to improve functionality of the game.
Basketball Holder
General uses
The basketball holders purposes and use
The basketball holder simply has some box collider attached to it which holds the basketball without it falling through the object
Score
ScoreAdd
The ScoreAdd object located underneath the hoop and what its used for
The ScoreAdd is an invisible object with a box collided, when the basketball colliders with the ScoreAdd it will apply a score of one and update to the UI score attached to the canvas in the world space
Basketball
How does the basketball affect the score
The basketball as a multiple purpose object is used to add score when collided with the ScoreAdd object
UI score display
The UI score and how it is applied into the scene
The UI score is applied into the scene being displayed as an object in world space. The canvas that I am going to create is going to be applied into the world space because this is more optimal for virtual reality instead of being fixed to the player’s view. The UI is located to the side of the hoop so it is easily visible when the player is shooting the ball.
Time
Win conditions
What are the win conditions applied to the game and how is this used
The win conditions are very simple to the game, the counter will count up to sixty seconds and when reached sixty seconds it will transport the player back to the main menu.
UI time display
The UI time and how it is applied in the scene
The UI time is displayed under the score and is clearly visible to the player. Not being attached to the player makes it better for
Main Menu
Quit box
A box and collider which is used to quit the game for interactive UI
This is just a bin which is used for when the player throws the ball into the bin it will quit the game, this uses a collider which when touched by the basketball will activate the quit game script. This way the UI is more interactive and vr friendly when starting the game.
Start box
A box and a collider which is used to switch the player to the main game scene with interactive UI
The start box is the same as the quit box, it uses a collider when the ball is thrown into the box the game will start. This makes use of a more effective UI used for vr. Instead of having a menu and a pointer this makes the main menu more interactive with the player for a better experience
Main Menu UI text
How is the text displayed in the main menu and how informative it is
The text in the main menu is displayed clearly and is within distance for the player to see it clearly. This is displayed in the middle of the two boxes which clearly displays the controls and labels the start and quit box.
Scripts in game –
Script
Object attached to?
How does it work?
BallScript
scoreAdd
If the basketball touches the collider it will add a score of 1 and be updated on the score UI. This communicates with the game manager script where the scoreText is stored.
FloorDestroy
Floor
When the ball connects with the box collider attached to the floor, the ball is destroyed. This will use a tag which is attached to the ball to communicate when the object has connected with the collider.
SpawnScript
SpawnPoint
This script controls the amount that is spawned, checking if the object is destroyed and then spawning into the object into the scene if the basketball is destroyed by the floor destroy
GameManager
GameManager Object
The game manager holds the values for if the game is won after sixty seconds and then puts the player back in the main menu scene. It also stores the values with the UIscript which is controlled and updated by the UIscript
UIscript
UIstore
This communicates with the time/score text which is stored in the GameManager script. The script uses UI management to update and control the time and score attached to the UIstore canvas.
Introduction: In this blog post I am going to be setting up a health bar in the game for my player which interacts when the player takes damage from the enemy. This will be using the Unity canvas which is used for making UI.
Reference Image
Image
Description
4a
In the hierarchy I created a UI>Canvas then added a UI>Slider. I am going to be using the slider for my health bar to give feedback to the player how much health the player has. Then I added a UI>text to update numerically how much health is left. I also added a UI>Image for the background for the player. This is so the health bar stands out more in the game screen and is easily recognised where it is in case of similar colours in the scene, like the green floor.Next all I need to do is change and rename the fill and text so when using in the script I will be attaching it is easier to recognise and interpret. I used the health slider because it is one of unity’s inbuilt UI features which I can use to apply values and manipulate for health bar. Instead of using a more complicated way to create my own health bar.
4b
Now I am going to create an empty object in the hierarchy and rename it GameManager. Before, I create a script for the GameManager. I am going to create a script to control the UI and name it “UIscript”. In the script I can make public variables meaning they can be manipulated from unity in the inspector. Then I’ve added the respective parts to each section so they are recognised by unity, for example in the inspector the UI script for the player health script can be placed in the script component in the health panel object. What this does is attaches the players health bar to the public variable “public Health healthScript” and recognises its the players health which is what is wanted for the main UI health bar.
4c
What is left is to test if the player’s health reduces if the enemy attack hits the player and does that show on the health bar. I am doing this because before I move on, it is important that components like this work because it is the core of the game. If the main components do not work within the game then the game is essentially broken and unplayable meaning a negative player experience.
4a – Health Bar on canvas
4a – Canvas with slider and HealthBar in the hierarchy of unity
4a – How the health bar looks in game
4b – UIscript
4b – GameManager Script
4b – UI script public variables evidence
4c – Health reduced Evidence
Player health bar reducing from enemy attack evidence
Intro : In this blog post I will be setting up the damage, attacking and interaction; damage and attacking are used for hitting the enemy and the pl
Reference Image
Image
Description
3a
Creating a health script and applying these to the player and the enemy. This is going to give the player and the enemy health in the scene.
3b
Enemy attack cube made then added box collider attached with enemy attack script onto the enemyAttack cube. The enemyAttack cube uses a box collider so when the player is inside that cube the player will receive damage to his health(health script attached to the player)and be destroyed. This sets up the basic attack for my enemy. The EnemyAttack cube is added as child on the player.
3c
Shooting script added to the playerSphere collider added to the enemy (when the enemy is shot, the enemy object will be destroyed)
3d
Interaction Script added to the playerInteraction script works when the player presses the Key “F” using a raycast that works when hitting the door.Then another script is made and added to the door that when the raycast hits the door from the interaction script, the door will move up on the z axis up 3.Lastly I have added in two walls and a door into the scene, created out of cubes and resized.
3e
Adjusting the Navmesh to give logic to the enemy so he can navigate round the walls and through the doors. This is separated into non- walkable and walkable sections on the floor and the scene needs to be rebaked. After this the enemy will be able to follow the player through the door instead of getting stuck on the door.
3a – Health Script
3b – EnemyAttack script
3b – Box collider added to the player with the enemy attack script evidence
3c – Player shooting script evidence
3c – Shooting Script
3d – Interaction script
3d – DoorOpenScript
3e – Wall and door and nav evidence
3e- Walkable, Non-Walkable and baking evidence
EnemyAttack and Player destroy GIF
This GIF shows that the enemyAttack box collider will destroy the player when inside the parameter of the cube
Shooting script gif
This is a gif of the players shooting script sending out a raycast to the enemy, hitting the enemy and destroying the enemy object.
Door interaction and NavMesh enemy navigation gif
In this gif the player can open the door using the raycast attached through the interaction/DoorOpenScript and
Intro – In this chapter I am going to set up the enemy using the AI system that unity have developed with the NavMeshAgent. I will be controlling this by adding a script to the enemy and communicating through the NavMeshAgent for the enemy movement.
NavMeshAgent – The NavMeshAgent uses built in AI to control the enemy navigate the scene, this is applied by adding the NavMeshAgent to the floor. This gives the ability to whom is creating to making objects in the scene static or non-static which helps the enemy move round obsticals in player playable area.
Reference Image
Image
Description
2a
Firstly we are going to add an enemy into the scene, to skip adding an object in I am going to go on Mixamoo which makes free 3D models with animations to import into the scene.I’m using mixamo because it has a variety of high quality models and animations which are all free for fair use. This saves time and makes the game look much better.
2b
EnemyNavMovement script, this script uses the in built AI for the player to communicate with the NavMeshAgent applied to the enemy. What this script does is follow the player also attaching the enemy attaching the enemy animations to the player. This is done so the blend tree can communicate the animations depending on velocity and speed.
2a – Evidence of importing from mixamoo
– Adding mixamoo model into the scene
Adjust to legacy materials
2b – NavMeshMovement Script
This script uses the unity engine AI and communicates with the NavMeshAgent following the player using the tag “Player”– Evidence of the NavMeshMovement script working and enemy moving towards the enemy
Intro – In this chapter, I am going to be adding starting mechanics for the game which is player movement. Player movement is a key part to the start of creating mechanics for the player. In this tutorial I will be adding objects and setting up the basic script to the player.
CHAPTER 1 LOG
Add cube Into the scene – 1a
Add Floor, Position(0.0.0)Scale (40.01.40) – 1b
Add RigidBody to floor – 1c
Reference number
Image
Description
1a
Add cube for the playerAdd cube for floorRename them in the hierarchy
1b
– Add another cube for the floor; change scale (40,0.1,40) – Add rigidbody to floor set as kinematic – Add rigidbody to playerParent main camera to the player adjust behind the player for the third person perspective – Create materials folder and materials (pink) for the player and (green) floor. Add materials into scene
1c
-Add player movement script for movement of the player -Add character controller onto the player because this attaches what inside the script to the player so it can communicate with the cube in the scene – Add Look X script onto the player – Add Look Y script onto the main camera
1a – Scene object player placement evidence 1
In this screenshot you can see that I have started to add the cube into the empty scene.
1b – Scene object placement evidence 2
More objects have now been added into the scene and the start of creating the player can be understood. I have added to the different colours to the player and the floor so it is easier for best practice when creating
1c – PlayerMovement Script
1d – Player movement gif
This short gif shows the players ability to move and jump round in the player space.
1e – Look X script
The look x script is attached to the player which uses the axis x for when the player looks up, he can look up and down on the x axis. This is for a more smooth camera control for the player instead of having a fixed camera without the player being able to navigate the player area effectively. This improves the user’s experience and makes the game more enjoyable because more freedom to look round is given to the player.


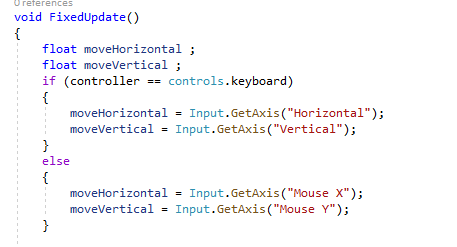


 Rotator child